Title: Absolute beginner to first fly
Post by: scotfly on April 17, 2011, 12:41:39 AM
Post by: scotfly on April 17, 2011, 12:41:39 AM
I had intended putting this up here a while ago but had forgotten until a recent thread on here. So here it is now.
Warning ? This thread is very long. I have tried to cover as much as possible to get you started.
Don?t let the length of this post put you off. With a little practice you will be able to tie flys like this in a couple of minute.
It is my hope that this, and a few subsequent threads I have planned, will take you from absolute beginner to reasonably confident enough to tie most of the basic patterns you will use.
Remember though, if there is anything you don?t understand or if you spot something I haven?t explained please ask.
I will apologise in advance for the poor quality of some of pictures and video, photography is not my strong point.
Some points to bear in mind with this and subsequent threads.
There are very few rights or wrongs in flytying. For the most part there are simply others ways of achieving the same results or other ways that, governed by other factors, are a better choice of method.
The methods I am about to show you are just one way, they are not meant to be taken as the ?only? way or the ?best? way. Take them and use them as a base upon which to build your portfolio of skills.
Much of what I say or show here will be my opinion. I?m neither infallible nor omnipotent, listen to what other experienced tyers say to you. Then together with your own experiences you can form your own opinions.
All instructions assume right-handed tyers
Sorry all you lefties, I can?t tie left handed so you will have to turn everything around to suit you.
Right, let?s begin.
You have been out and bought the basic tools and materials you will need and you?re sitting there thinking? HELP!!!
Don?t panic fly tying is easy, but like everything in life it is only easy when you know how.
So firstly, let?s take your bobbin holder. Whichever one you have it will look like one of these pictured.
From left to right... Griffin Magnum Ceramic, Tiemco Master Bobbin and Tiemco Straight with white tube. Don?t worry if yours are not the same makes.
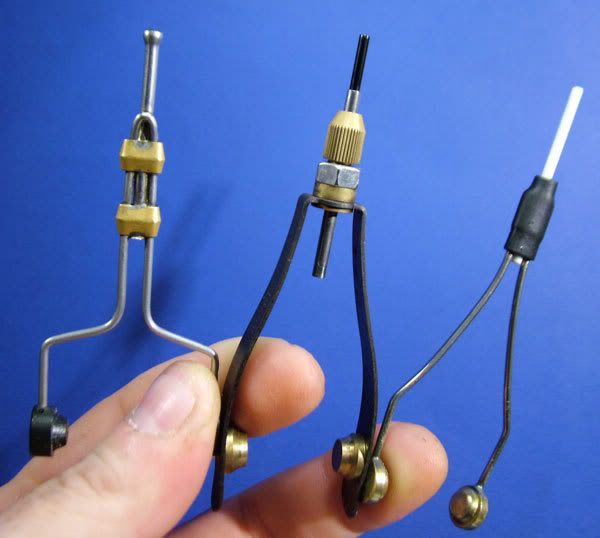
The Griffin Magnum Ceramic is specifically designed to hold the modern spools of thread such as Uni- Thread, UTC, Bennechi, Danville?s, etc. So you shouldn?t need to adjust this one.
The others are designed to fit a range of spool types. So in all probability you will need to adjust the tension on them.
The legs are sprung steel and these are what hold the spool under tension. You may be lucky a get a bobbin holder which doesn?t need any adjustment, but most are too tight and will require altering. The tension you are aiming for is tight enough so the bobbin doesn?t drop to the floor under its own weight when it is hanging from the hook, but loose enough that it feeds freely when you are tying.
To adjust the bobbin you need to bend the legs slightly to open them a little. You have to be careful though, do it the wrong way and you run the risk of breaking the bobbin.
The correct way to adjust them is as follow.
STEP 1
Grip the bobbin tightly where the legs join the main shaft. This is the weak point and the area you must protect.
STEP 2
Whilst keeping a tight grip on the weak point, use your other hand to gently spring/bend the leg slightly outwards.
Before attempting this there are two points to remember.
One ? Don?t over do it. Spring it a little and try the spool in it. If it requires more simply repeat until the tension is right.
Two ? You have to bend/ spring both legs equally so that the spool of thread will remain central in the bobbin. So when you bend/spring one leg, rotate the bobbin and repeat with the other leg.
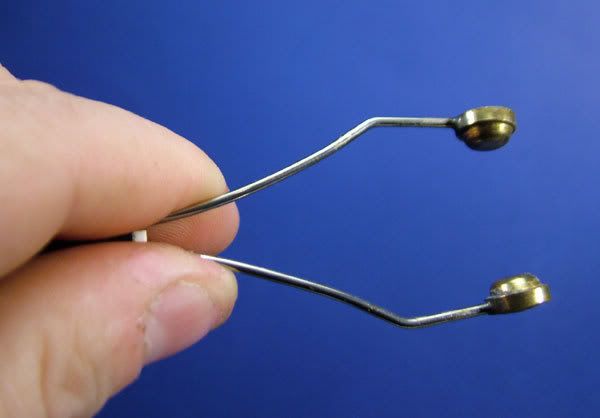
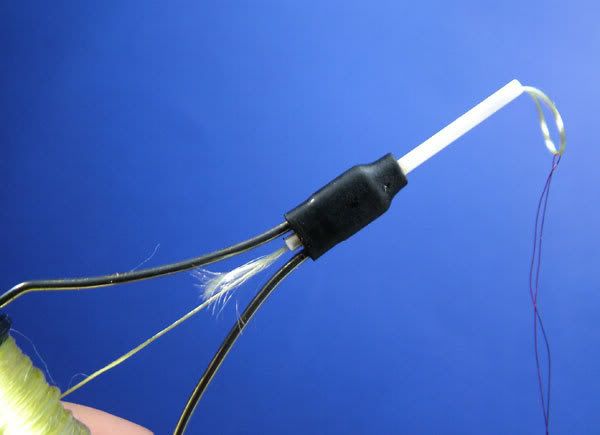
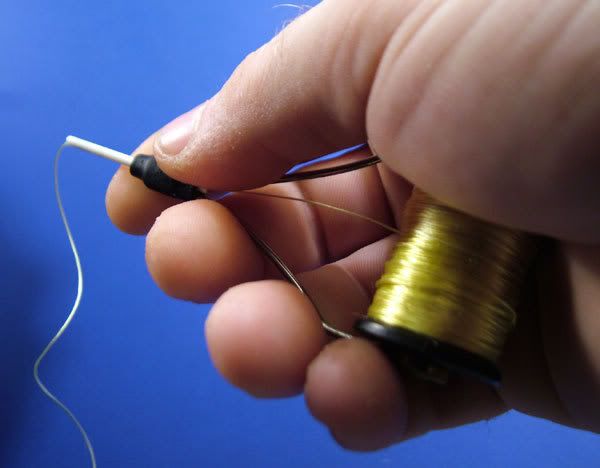
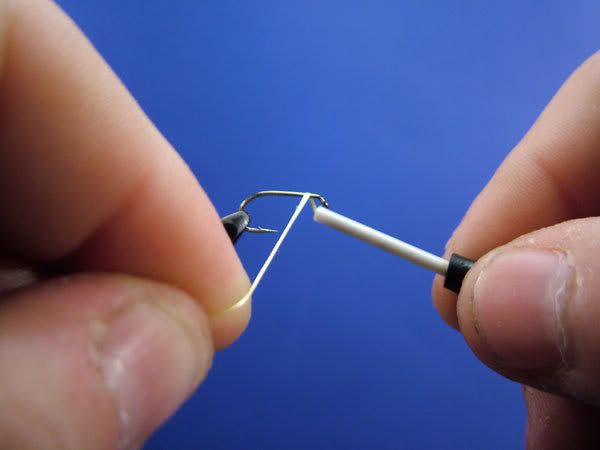
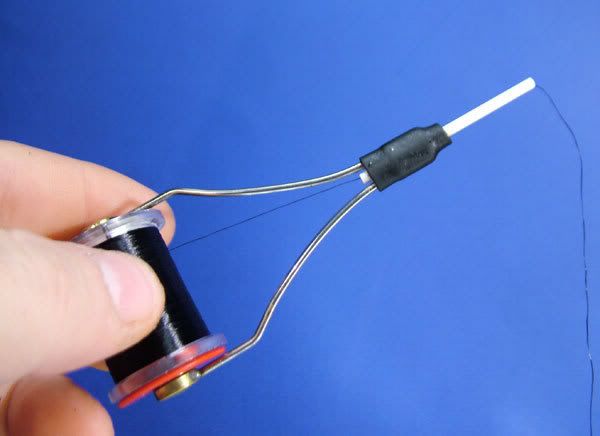
Ok, you now have the tension set and you?re thinking how do I get the thread through that tiny tube. The answer is you will need a bobbin threader.
These are just three of the many available. They are from bottom to top? A bought wire loop type, a bought hooked end type and finally a home made wire loop type.
The home made one is simply a looped length of fine copper wire attached to a piece of foam. The foam is there simply to make it easy to find on the bench. You can use wool or anything for the end.
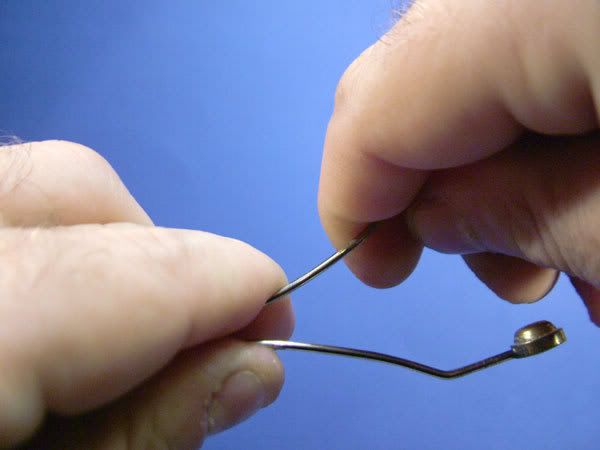
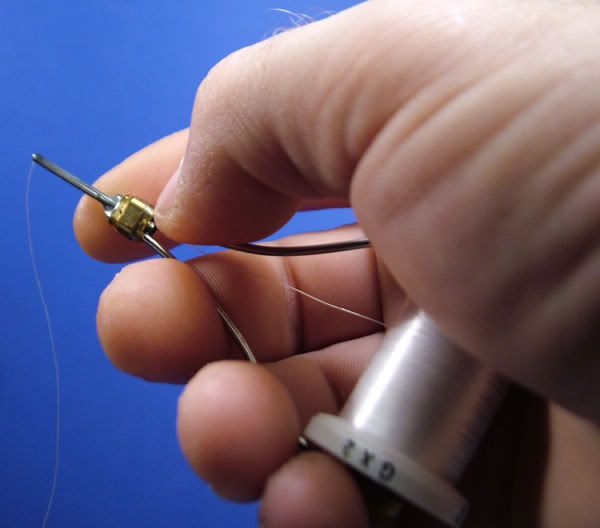
STEP 1
To thread the bobbin you feed the wire loop from the top all the way through the tube. Then pull off some thread and pass the end through the loop of wire. I?ve used floss here so that you can see it easier.
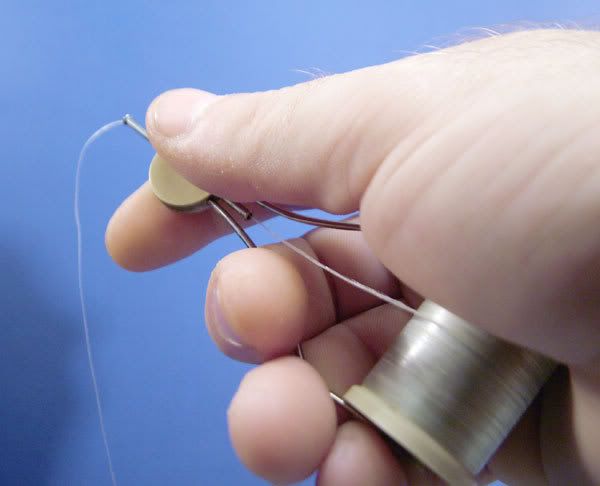
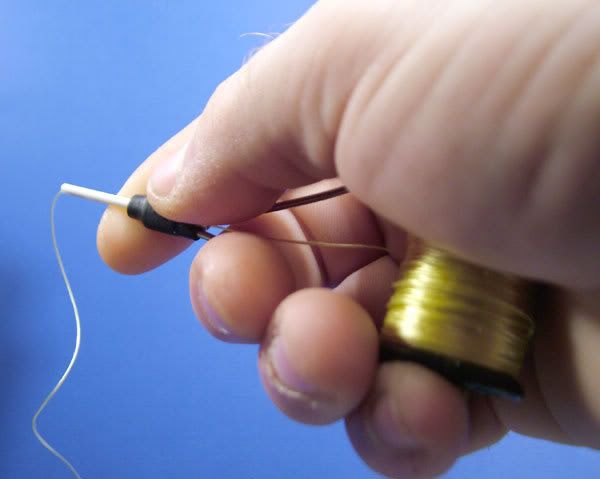
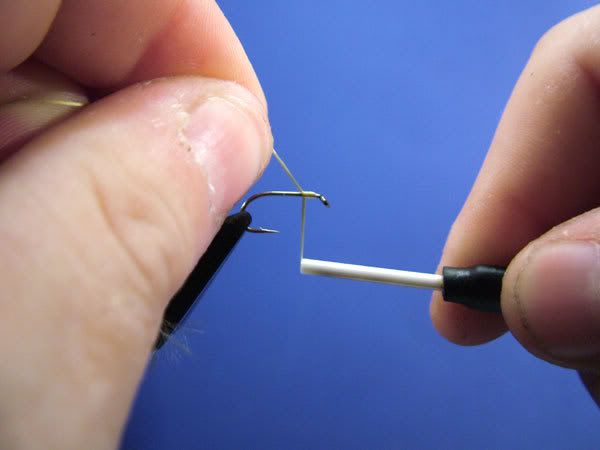
STEP 2
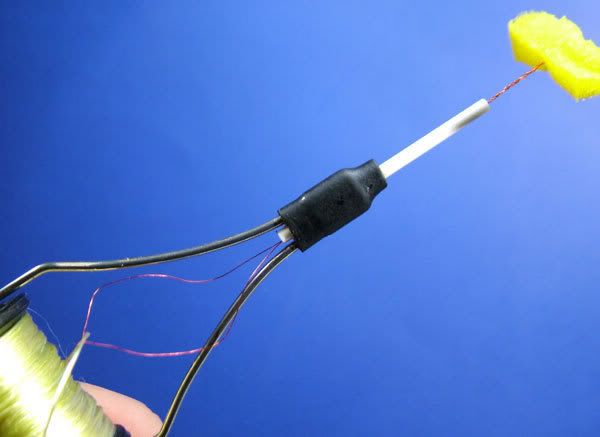
Then it is a simple case of pulling the wire loop back up through the tube taking the thread with it.
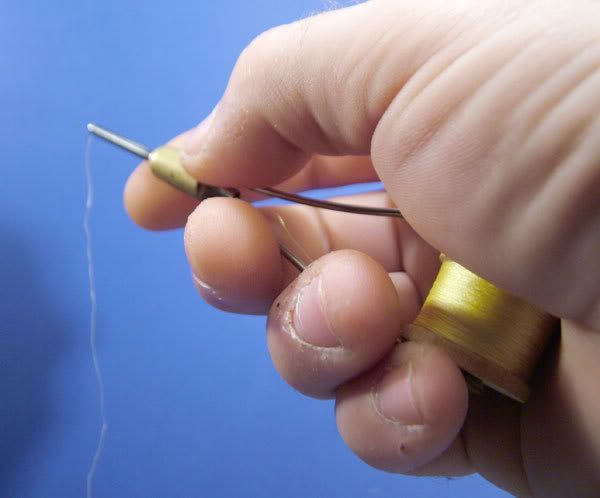
Until you pull it all the way out and you are left with the spool of thread between the legs and the thread all the way through the tube as shown.

Ok, some might think this a stupid question.
How do I hold the bobbin when I?m tying?
This leads me into a very important point. There are no stupid questions. It doesn?t matter what it is, if you don?t know, it is not stupid. If you don?t know and don?t ask? well that would be stupid, wouldn?t it!!!
To answer the question, you hold the bobbing something like this. You won?t hold it exactly the same, but there will be little difference. As you can see it with the different bobbins and types of spool there is very little difference between the grips. The most important thing is that it should be comfortable in the hand.
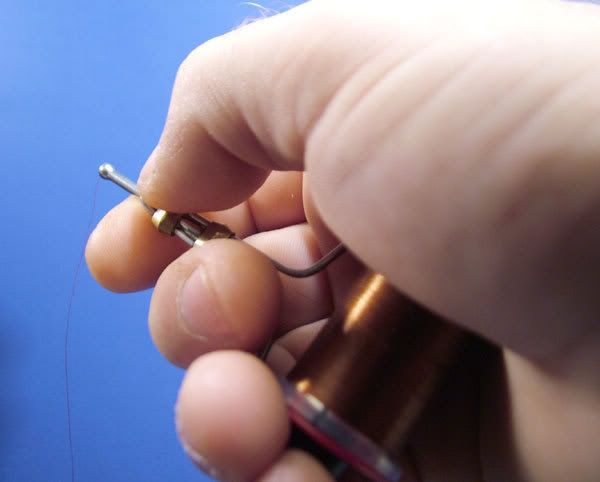
Another important point with the grip is that it should offer you complete control of the thread tension.
When I showed you above how to set the tension on the bobbin I told you that it should be strong enough so that the spool doesn?t freewheel under the weight of the bobbin, but weak enough that the spool feeds freely when you are tying. There are times though when you will want to increase the tension of even stop the spool from feeding all together.
This is where the grip shown allows you to exorcise complete control over the tension.
For normal tying you simply hold the bobbin normally.
If you want to increase the tension, even to the point of stopping the thread feeding, you simply apply pressure to gently squeeze the bobbin legs together, thus increasing the tension.
OK, you now know how to tension the bobbin and how to thread the tube. You also have a good idea of how to hold the bobbin when you?re tying. So I bet you?re desperate to get that hook in the vice. That leads us into your next question.
Is there a right or wrong way to put the hook in the vice?
This is probably the first point where you are going to see a difference of opinions. Some tyers prefer what I consider to be the wrong way. I am going to show what I think is the right way and why.
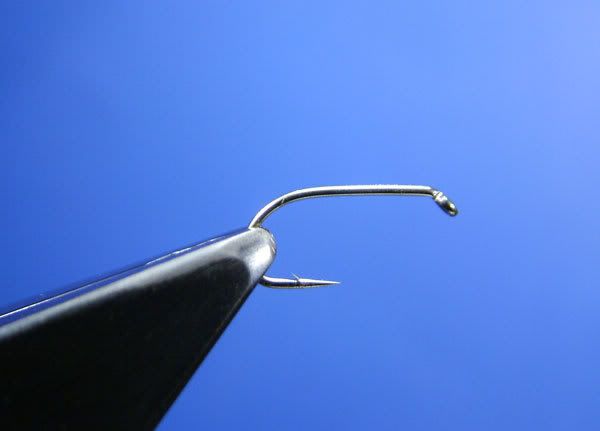
Some tyers will say that you should mount the hook in the vice like this.
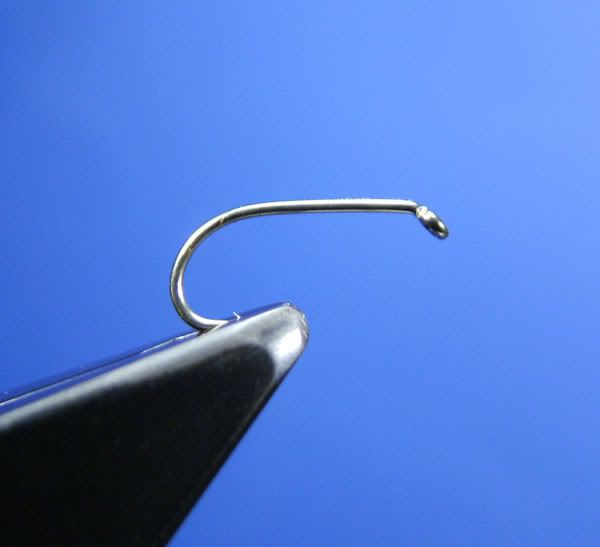
The main reason given is that by masking the hook point in the jaws of the vice you will not catch the thread, or your finger, on the hook point.
I would disagree, the hook point is a very minor problem that you will very quickly overcome/avoid.
Two very important reasons for not mounting the hook in this way are?
1 ? If you look closely at the hook you will see that almost half the hook shank is behind (to the left of) the vice head. This means that for half the fly the vice head is a hindrance. This problem becomes more acute the smaller the hook.
2 ? This is the most important reason. The point on a hook is tapered, like a spear. This means that although a fairly large portion of the hook is within the vice jaws, only a small proportion of it is gripped by the vice. This in turn means that you are putting all the strain on a smaller area, thus increasing the chances of damaging either the hook and/ or the jaws of the vice.
This is the way I mount the hook, and the way I would recommend to you.
The main reasons I mount the hook this way are?
1 ? All of the usable portion of the shank is clear of the vice head. This maximises your working space.
2 ? The hook is gripped with the maximum area possible. This reduces the chances of damage to either the hook or the jaws.
To avoid catching the hook point with either the thread or your fingers you simply alter the angle of the wraps.
Normally you will wrap the thread at an angle somewhere in the region of 10-15 degrees to the left or right of the perpendicular. When you reach the hook point you simply increase this angle so that when the thread is passing under the hook shank near the hook point it is angled away (to the right) of the perpendicular. This is something you will very quickly, almost instinctively, master. When you are wrapping materials where it is inconvenient to wrap at an angle, you simple wrap to the hook point then simply move the material round the hook point and continue wrapping.
The following is reproduced with the kind permission of Niclas Runarsson
A good thing to think about is also how the hook is placed inside the jaws. All jaws aren't exactly parallel... and I'm referring especially to the ones which are actually CALLED 'parallel jaws'. They might be parallel when open, but as the gap in the rear end expands to close the tip end, they won't be parallel when tightened.
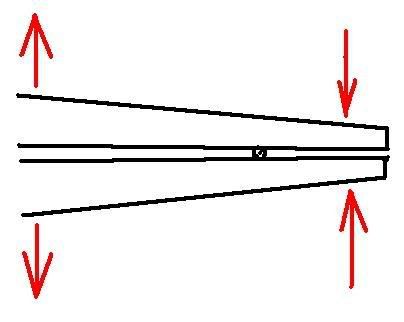
This might not matter much... it depends on both hook sizes, hook models, shape of jaws and vise models. I have seen vises where it doesn't matter at all and I have seen really nasty ones.
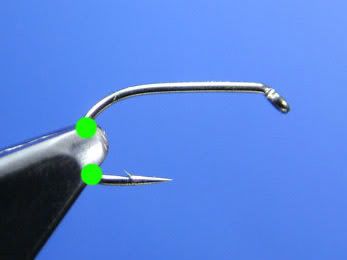
I will use Scotfly's picture as an example... just because it was there which saved me drawing my own pictures, so don't read anything into it.
In jaws which aren't exactly parallel, the pressure will not be evenly distributed over the hook bend, as the jaws will be closer to each other the closer to the tip you get. On a hook placed like this, there will be one point that will be gripped harder than the rest of the bend (the upper green spot). One point tighter than the other will mean that the other will slip easier.
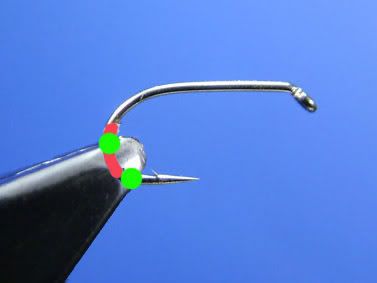
The next picture shows (after Photoshopping Scotfly's picture) a hook position where the hook is placed so the two points closest to the tip have the same distance to the tip. (I missed a little, but they were supposed to have.) This means that the grip will be equally tight on both of them, none of them will be more prone to slip than the other and none of them will act as an axis of rotation.
Jaws shouldn't be tightened more than necessary to hold the hook, and if you place the hook right you can save on the muscle work and add some life time to the jaws. 'Perpendicular' is poetry to a vise.
Before we get tying let?s look at your set-up.
Try to set your tying area up with everything at hand. You will suffer less frustration if you are not continually looking for this or that or having to find space to lay something down.
This is my tying area which will give you an idea of what I think a tying area should look like.
This is my tying desk, as you can see I have good lighting, everything is at hand and organised and the desk is tidy.
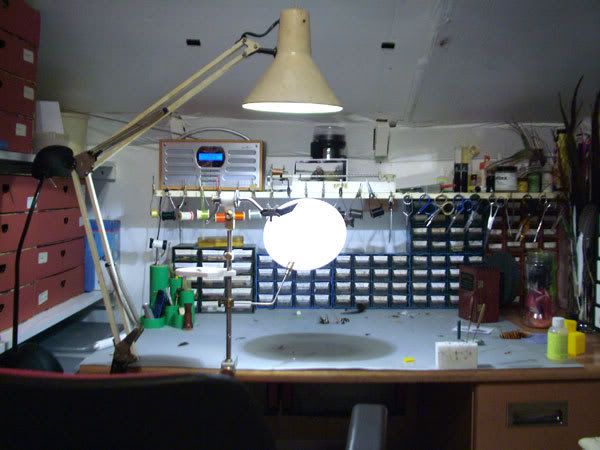
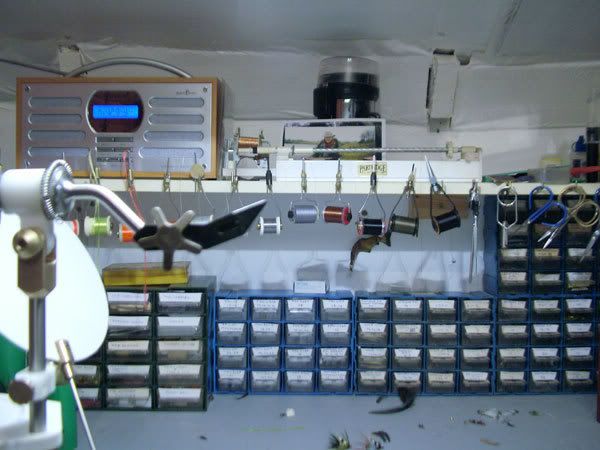
This is an example of what I mean by everything is at hand. As you can see my bobbin holder, hackle pliers and scissors are all readily available to me. The dubbing needles, to the right of the vice, are stuck in a piece of foam which is stuck to the desk. This means that the dubbing needles are close at hand, and because I keep mine in foam, they are always clean. The drawers at the back contain all my trout hooks organised by type of hook and in descending sizes. This means that when I want a certain hook it is at hand and I do not need to search for it.
I realise that most will not have a dedicated tying area like mine, but even if you have to get your tying stuff out for every session try to keep it as organised as possible. It is good practice to only have out what you need for the fly you are tying. If you are going to tie another pattern, put the stuff away from the first pattern before you start the second.
When you first begin tying it is a good idea to try setting your vice and/or chair at different heights until you find what suits you best and allows you tie without suffering fatigue or pain.
Ok, let?s get started tying.
Attaching the thread to the hook.
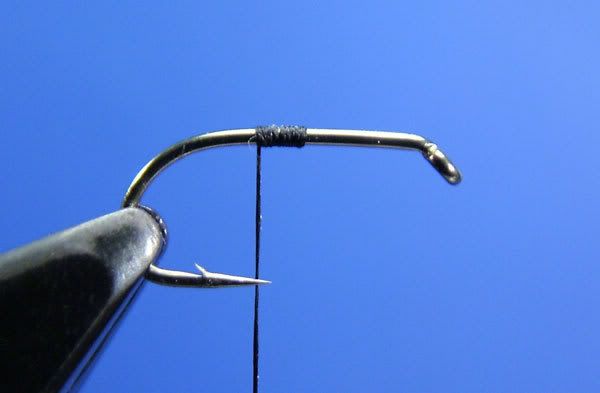
To attach the thread to the hook you simply hold the tag of thread in your non-tying hand and on top of the hook while the bobbin is in your tying hand.
I have used stout floss here to make it easier for you to see.
Then, still holding the tag, start to wrap the thread round the hook and the tag of thread. If you hold the tag up while you are wrapping, the thread will be guided down to the previous turn of thread, giving you an easy neat wrap.
Once you have enough wraps you can trim the tag to waste with you scissors.
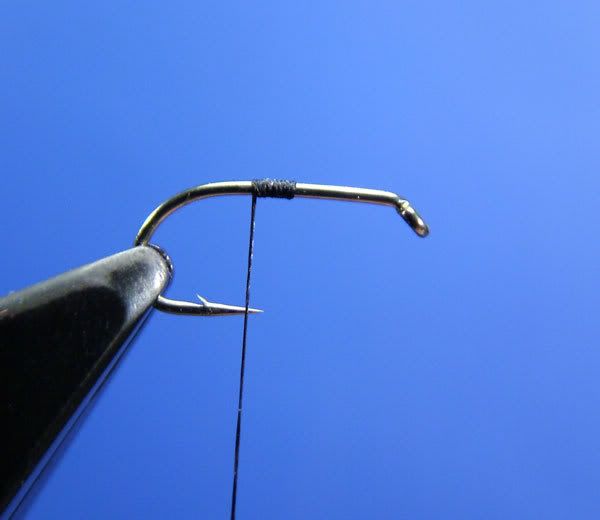
Before you go any farther it is worth becoming familiar with your threads strength. To do this you need to break it. Do this a few time and you will soon learn how much tension you can apply to the thread.
To do this?.
Attach the thread near the hook bend. I am using 6/0 Uni Thread here.
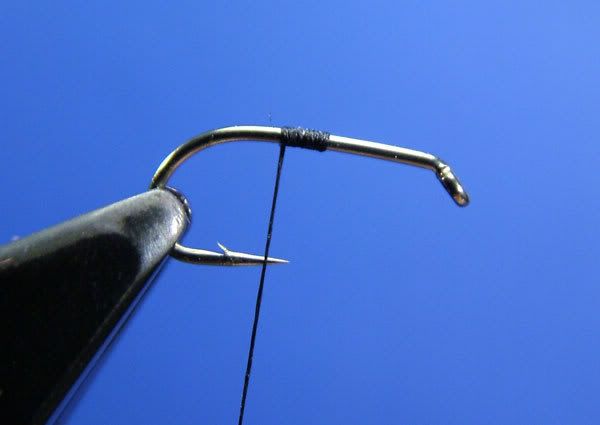
Then start to pull downwards. You should support the hook here so that it doesn?t break. I have not held it here so that you can see better, both the process, and because you can see the hook bend, you can get an idea of the amount of tension I am putting on the thread.
Now start pulling, slowly increasing the tension. You can see here that the hook is bending under the strain.
More tension.
Snap.
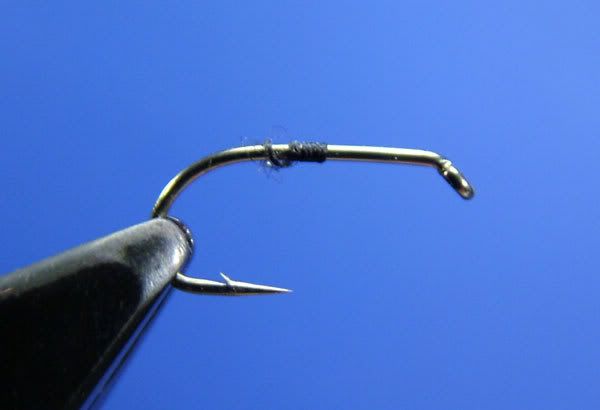
Do this several times to familiarise yourself with the strength of the thread.
Don?t forget to support the hook whilst you do this
OK, I?ve attached the thread, now what?
Now you learn how to do a half hitch and how to whipfinish.
The whipfinish is a series of half hitches. It is very easy to do? Once you know how! The hard part is learning it.
These are some tutorials using a whipfinish tool on other web sites.
http://www.sexyloops.com/flytying/whipfinish.shtml
http://flyfisherman.com/ftb/jbwhip/
http://www.midcurrent.com/articles/flies/talleur_whipme.aspx
Ok, now can I tie a fly?
If you can do the half hitch and whipfinish with confidence? Yes
If you are struggling? No, go and practice it some more.
I want to tie a fly?. Now!
Ok, Ok, let?s tie you first fly.
Preparation.
Your first fly is the Black and Peacock Spider. You will need the following tools and materials.
A standard wet fly hook such as the Kamasan B175 in size 10 or 12

A bobbin holder loaded with a suitable black thread such as 6/0 UNI-Thread. The thread I am using here is UTC 70, this is roughly equivalent to 8/0 UNI-Thread. I have recommended that you use 6/0 because, although it is thicker it is also stronger and you should have fewer problems with breakages. If you prefer you can of course use 8/0 or similar.
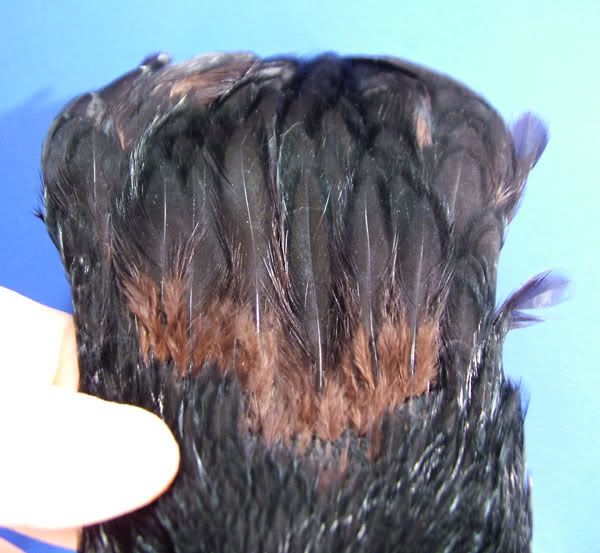
A black hen cape. This one has been well used.
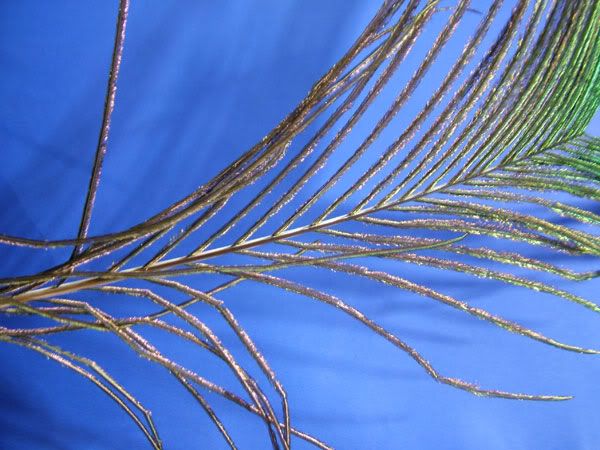
Peacock Herl. This is a whole tail feather, more often than not now you buy it as a strung bunch.
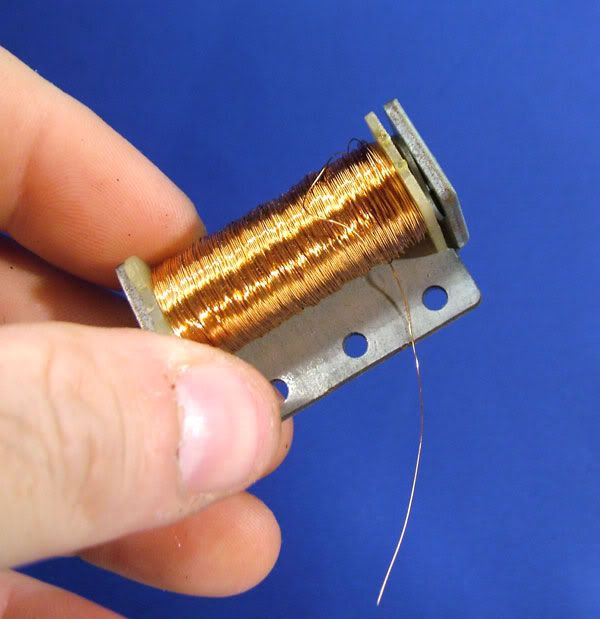
Some copper wire. You can buy it on spools, or you can get it free from old electrical motors.
Scissors, dubbing needle and hackle pliers.
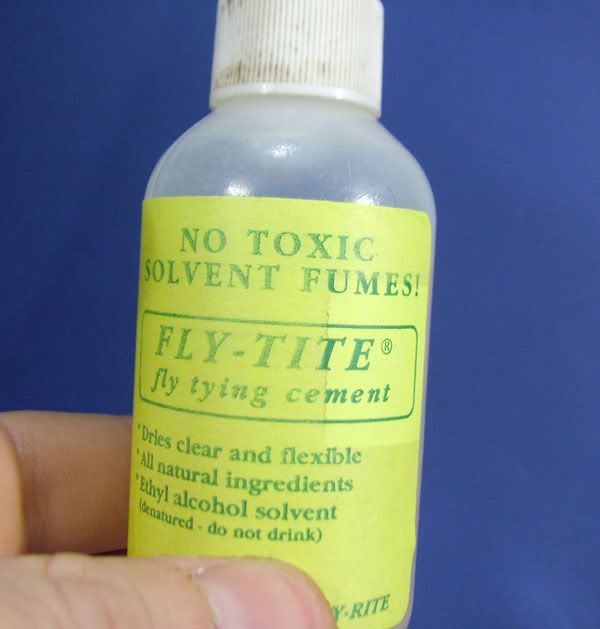
Varnish. This is the one I use, there are plenty of others to choose from though. Or you can use nail varnish.
I?ll show you how to prepare the materials first so that when we tie the fly you will have everything prepared and at hand.
If you are using strung Peacock Herl you will simply need to pull out the required amount.
If your Herl is still on the stem you need to select it and prepare it..
To select it simply pull the required number of Herls from the stem. You can of course just cut them off.
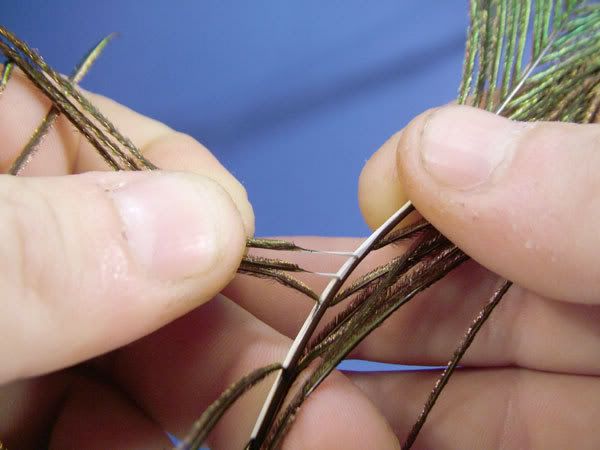
If you have pulled them off you will be left with Herls with curls attached.
The curls are a hindrance for this fly, so take a pair of scissors and cut them off.
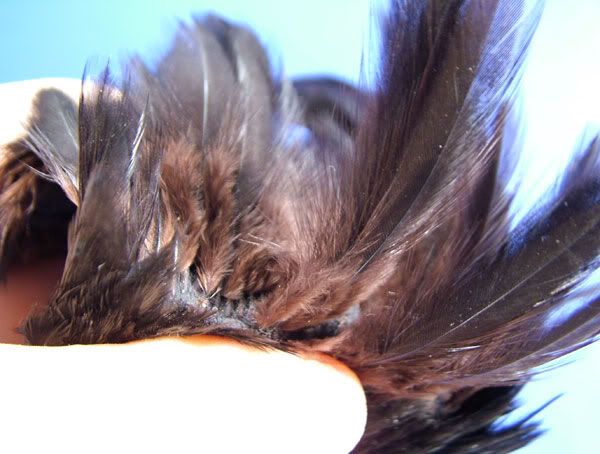
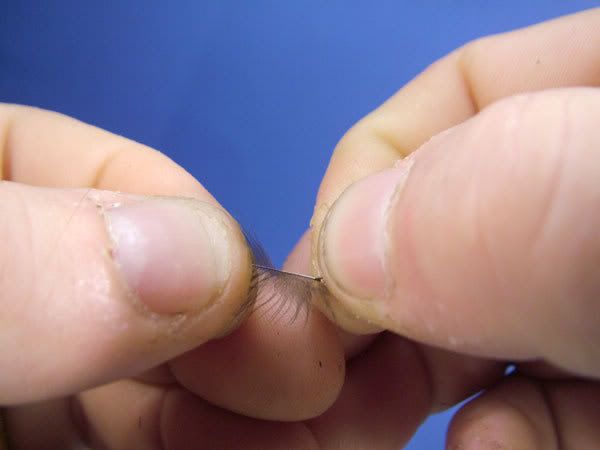
To select and prepare your hackle take your cape and bend it back. This will make the feathers sit up a bit and make it easier for you to select an appropriate hackle.
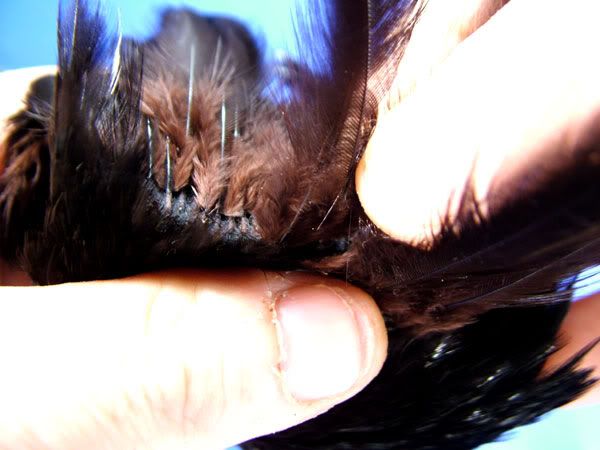
Once you have selected your hackle grip near its base and simply pull it out.
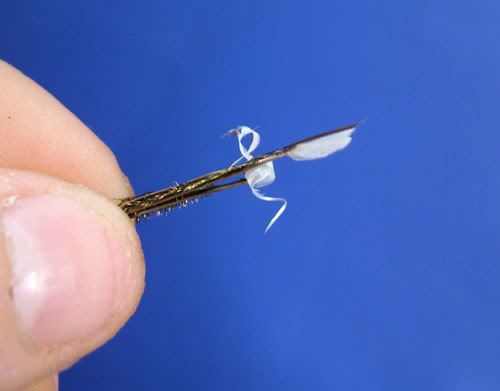
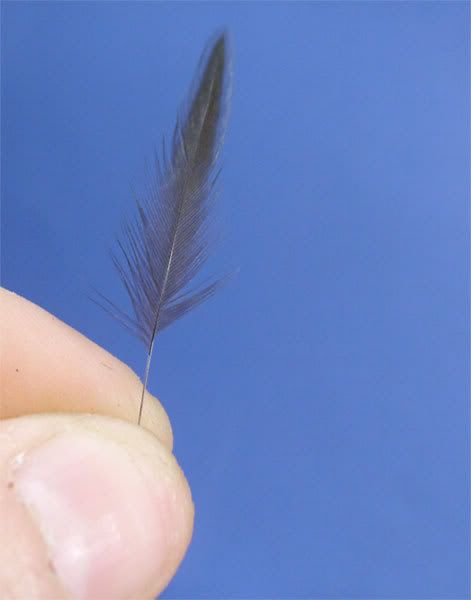
You should now have a feather which looks like this.
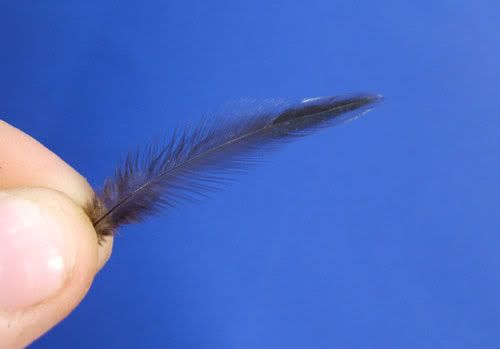
To see if it?s the right size hold it on the hook like this. The fibres should be 1 ? 11/2 times the gape of the hook. The gape is the gap between the hook point and the shank.

To prepare it for tying in, using your fingers, strip the waste fibres from the bottom of the hackle.
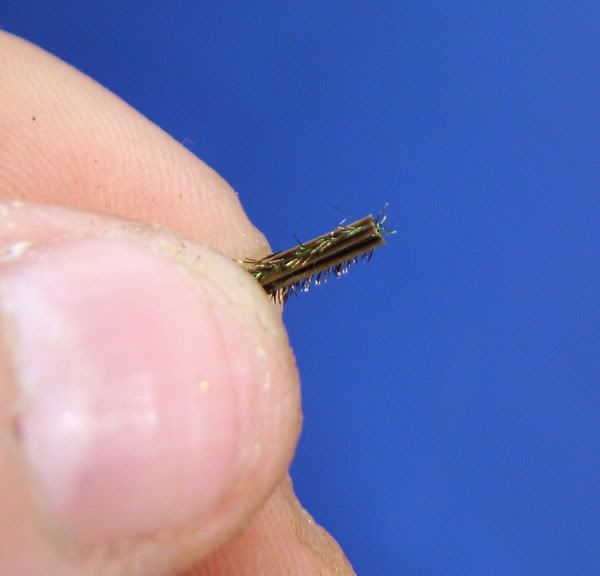
Once you have stripped the waste flue from the bottom of the hackle it will look like this.
You will see that I have stripped two or three more fibres from one side. This will help when you come to wrap the hackle.
Warning ? This thread is very long. I have tried to cover as much as possible to get you started.
Don?t let the length of this post put you off. With a little practice you will be able to tie flys like this in a couple of minute.
It is my hope that this, and a few subsequent threads I have planned, will take you from absolute beginner to reasonably confident enough to tie most of the basic patterns you will use.
Remember though, if there is anything you don?t understand or if you spot something I haven?t explained please ask.
I will apologise in advance for the poor quality of some of pictures and video, photography is not my strong point.
Some points to bear in mind with this and subsequent threads.
There are very few rights or wrongs in flytying. For the most part there are simply others ways of achieving the same results or other ways that, governed by other factors, are a better choice of method.
The methods I am about to show you are just one way, they are not meant to be taken as the ?only? way or the ?best? way. Take them and use them as a base upon which to build your portfolio of skills.
Much of what I say or show here will be my opinion. I?m neither infallible nor omnipotent, listen to what other experienced tyers say to you. Then together with your own experiences you can form your own opinions.
All instructions assume right-handed tyers
Sorry all you lefties, I can?t tie left handed so you will have to turn everything around to suit you.
Right, let?s begin.
You have been out and bought the basic tools and materials you will need and you?re sitting there thinking? HELP!!!
Don?t panic fly tying is easy, but like everything in life it is only easy when you know how.
So firstly, let?s take your bobbin holder. Whichever one you have it will look like one of these pictured.
From left to right... Griffin Magnum Ceramic, Tiemco Master Bobbin and Tiemco Straight with white tube. Don?t worry if yours are not the same makes.
The Griffin Magnum Ceramic is specifically designed to hold the modern spools of thread such as Uni- Thread, UTC, Bennechi, Danville?s, etc. So you shouldn?t need to adjust this one.
The others are designed to fit a range of spool types. So in all probability you will need to adjust the tension on them.
The legs are sprung steel and these are what hold the spool under tension. You may be lucky a get a bobbin holder which doesn?t need any adjustment, but most are too tight and will require altering. The tension you are aiming for is tight enough so the bobbin doesn?t drop to the floor under its own weight when it is hanging from the hook, but loose enough that it feeds freely when you are tying.
To adjust the bobbin you need to bend the legs slightly to open them a little. You have to be careful though, do it the wrong way and you run the risk of breaking the bobbin.
The correct way to adjust them is as follow.
STEP 1
Grip the bobbin tightly where the legs join the main shaft. This is the weak point and the area you must protect.
STEP 2
Whilst keeping a tight grip on the weak point, use your other hand to gently spring/bend the leg slightly outwards.
Before attempting this there are two points to remember.
One ? Don?t over do it. Spring it a little and try the spool in it. If it requires more simply repeat until the tension is right.
Two ? You have to bend/ spring both legs equally so that the spool of thread will remain central in the bobbin. So when you bend/spring one leg, rotate the bobbin and repeat with the other leg.
Ok, you now have the tension set and you?re thinking how do I get the thread through that tiny tube. The answer is you will need a bobbin threader.
These are just three of the many available. They are from bottom to top? A bought wire loop type, a bought hooked end type and finally a home made wire loop type.
The home made one is simply a looped length of fine copper wire attached to a piece of foam. The foam is there simply to make it easy to find on the bench. You can use wool or anything for the end.
STEP 1
To thread the bobbin you feed the wire loop from the top all the way through the tube. Then pull off some thread and pass the end through the loop of wire. I?ve used floss here so that you can see it easier.
STEP 2
Then it is a simple case of pulling the wire loop back up through the tube taking the thread with it.
Until you pull it all the way out and you are left with the spool of thread between the legs and the thread all the way through the tube as shown.
Ok, some might think this a stupid question.
How do I hold the bobbin when I?m tying?
This leads me into a very important point. There are no stupid questions. It doesn?t matter what it is, if you don?t know, it is not stupid. If you don?t know and don?t ask? well that would be stupid, wouldn?t it!!!
To answer the question, you hold the bobbing something like this. You won?t hold it exactly the same, but there will be little difference. As you can see it with the different bobbins and types of spool there is very little difference between the grips. The most important thing is that it should be comfortable in the hand.
Another important point with the grip is that it should offer you complete control of the thread tension.
When I showed you above how to set the tension on the bobbin I told you that it should be strong enough so that the spool doesn?t freewheel under the weight of the bobbin, but weak enough that the spool feeds freely when you are tying. There are times though when you will want to increase the tension of even stop the spool from feeding all together.
This is where the grip shown allows you to exorcise complete control over the tension.
For normal tying you simply hold the bobbin normally.
If you want to increase the tension, even to the point of stopping the thread feeding, you simply apply pressure to gently squeeze the bobbin legs together, thus increasing the tension.
OK, you now know how to tension the bobbin and how to thread the tube. You also have a good idea of how to hold the bobbin when you?re tying. So I bet you?re desperate to get that hook in the vice. That leads us into your next question.
Is there a right or wrong way to put the hook in the vice?
This is probably the first point where you are going to see a difference of opinions. Some tyers prefer what I consider to be the wrong way. I am going to show what I think is the right way and why.
Some tyers will say that you should mount the hook in the vice like this.
The main reason given is that by masking the hook point in the jaws of the vice you will not catch the thread, or your finger, on the hook point.
I would disagree, the hook point is a very minor problem that you will very quickly overcome/avoid.
Two very important reasons for not mounting the hook in this way are?
1 ? If you look closely at the hook you will see that almost half the hook shank is behind (to the left of) the vice head. This means that for half the fly the vice head is a hindrance. This problem becomes more acute the smaller the hook.
2 ? This is the most important reason. The point on a hook is tapered, like a spear. This means that although a fairly large portion of the hook is within the vice jaws, only a small proportion of it is gripped by the vice. This in turn means that you are putting all the strain on a smaller area, thus increasing the chances of damaging either the hook and/ or the jaws of the vice.
This is the way I mount the hook, and the way I would recommend to you.
The main reasons I mount the hook this way are?
1 ? All of the usable portion of the shank is clear of the vice head. This maximises your working space.
2 ? The hook is gripped with the maximum area possible. This reduces the chances of damage to either the hook or the jaws.
To avoid catching the hook point with either the thread or your fingers you simply alter the angle of the wraps.
Normally you will wrap the thread at an angle somewhere in the region of 10-15 degrees to the left or right of the perpendicular. When you reach the hook point you simply increase this angle so that when the thread is passing under the hook shank near the hook point it is angled away (to the right) of the perpendicular. This is something you will very quickly, almost instinctively, master. When you are wrapping materials where it is inconvenient to wrap at an angle, you simple wrap to the hook point then simply move the material round the hook point and continue wrapping.
The following is reproduced with the kind permission of Niclas Runarsson
A good thing to think about is also how the hook is placed inside the jaws. All jaws aren't exactly parallel... and I'm referring especially to the ones which are actually CALLED 'parallel jaws'. They might be parallel when open, but as the gap in the rear end expands to close the tip end, they won't be parallel when tightened.
This might not matter much... it depends on both hook sizes, hook models, shape of jaws and vise models. I have seen vises where it doesn't matter at all and I have seen really nasty ones.
I will use Scotfly's picture as an example... just because it was there which saved me drawing my own pictures, so don't read anything into it.
In jaws which aren't exactly parallel, the pressure will not be evenly distributed over the hook bend, as the jaws will be closer to each other the closer to the tip you get. On a hook placed like this, there will be one point that will be gripped harder than the rest of the bend (the upper green spot). One point tighter than the other will mean that the other will slip easier.
The next picture shows (after Photoshopping Scotfly's picture) a hook position where the hook is placed so the two points closest to the tip have the same distance to the tip. (I missed a little, but they were supposed to have.) This means that the grip will be equally tight on both of them, none of them will be more prone to slip than the other and none of them will act as an axis of rotation.
Jaws shouldn't be tightened more than necessary to hold the hook, and if you place the hook right you can save on the muscle work and add some life time to the jaws. 'Perpendicular' is poetry to a vise.
Before we get tying let?s look at your set-up.
Try to set your tying area up with everything at hand. You will suffer less frustration if you are not continually looking for this or that or having to find space to lay something down.
This is my tying area which will give you an idea of what I think a tying area should look like.
This is my tying desk, as you can see I have good lighting, everything is at hand and organised and the desk is tidy.
This is an example of what I mean by everything is at hand. As you can see my bobbin holder, hackle pliers and scissors are all readily available to me. The dubbing needles, to the right of the vice, are stuck in a piece of foam which is stuck to the desk. This means that the dubbing needles are close at hand, and because I keep mine in foam, they are always clean. The drawers at the back contain all my trout hooks organised by type of hook and in descending sizes. This means that when I want a certain hook it is at hand and I do not need to search for it.
I realise that most will not have a dedicated tying area like mine, but even if you have to get your tying stuff out for every session try to keep it as organised as possible. It is good practice to only have out what you need for the fly you are tying. If you are going to tie another pattern, put the stuff away from the first pattern before you start the second.
When you first begin tying it is a good idea to try setting your vice and/or chair at different heights until you find what suits you best and allows you tie without suffering fatigue or pain.
Ok, let?s get started tying.
Attaching the thread to the hook.
To attach the thread to the hook you simply hold the tag of thread in your non-tying hand and on top of the hook while the bobbin is in your tying hand.
I have used stout floss here to make it easier for you to see.
Then, still holding the tag, start to wrap the thread round the hook and the tag of thread. If you hold the tag up while you are wrapping, the thread will be guided down to the previous turn of thread, giving you an easy neat wrap.
Once you have enough wraps you can trim the tag to waste with you scissors.
Before you go any farther it is worth becoming familiar with your threads strength. To do this you need to break it. Do this a few time and you will soon learn how much tension you can apply to the thread.
To do this?.
Attach the thread near the hook bend. I am using 6/0 Uni Thread here.
Then start to pull downwards. You should support the hook here so that it doesn?t break. I have not held it here so that you can see better, both the process, and because you can see the hook bend, you can get an idea of the amount of tension I am putting on the thread.
Now start pulling, slowly increasing the tension. You can see here that the hook is bending under the strain.
More tension.
Snap.
Do this several times to familiarise yourself with the strength of the thread.
Don?t forget to support the hook whilst you do this
OK, I?ve attached the thread, now what?
Now you learn how to do a half hitch and how to whipfinish.
The whipfinish is a series of half hitches. It is very easy to do? Once you know how! The hard part is learning it.
These are some tutorials using a whipfinish tool on other web sites.
http://www.sexyloops.com/flytying/whipfinish.shtml
http://flyfisherman.com/ftb/jbwhip/
http://www.midcurrent.com/articles/flies/talleur_whipme.aspx
Ok, now can I tie a fly?
If you can do the half hitch and whipfinish with confidence? Yes
If you are struggling? No, go and practice it some more.
I want to tie a fly?. Now!
Ok, Ok, let?s tie you first fly.
Preparation.
Your first fly is the Black and Peacock Spider. You will need the following tools and materials.
A standard wet fly hook such as the Kamasan B175 in size 10 or 12
A bobbin holder loaded with a suitable black thread such as 6/0 UNI-Thread. The thread I am using here is UTC 70, this is roughly equivalent to 8/0 UNI-Thread. I have recommended that you use 6/0 because, although it is thicker it is also stronger and you should have fewer problems with breakages. If you prefer you can of course use 8/0 or similar.
A black hen cape. This one has been well used.
Peacock Herl. This is a whole tail feather, more often than not now you buy it as a strung bunch.
Some copper wire. You can buy it on spools, or you can get it free from old electrical motors.
Scissors, dubbing needle and hackle pliers.
Varnish. This is the one I use, there are plenty of others to choose from though. Or you can use nail varnish.
I?ll show you how to prepare the materials first so that when we tie the fly you will have everything prepared and at hand.
If you are using strung Peacock Herl you will simply need to pull out the required amount.
If your Herl is still on the stem you need to select it and prepare it..
To select it simply pull the required number of Herls from the stem. You can of course just cut them off.
If you have pulled them off you will be left with Herls with curls attached.
The curls are a hindrance for this fly, so take a pair of scissors and cut them off.
To select and prepare your hackle take your cape and bend it back. This will make the feathers sit up a bit and make it easier for you to select an appropriate hackle.
Once you have selected your hackle grip near its base and simply pull it out.
You should now have a feather which looks like this.
To see if it?s the right size hold it on the hook like this. The fibres should be 1 ? 11/2 times the gape of the hook. The gape is the gap between the hook point and the shank.
To prepare it for tying in, using your fingers, strip the waste fibres from the bottom of the hackle.
Once you have stripped the waste flue from the bottom of the hackle it will look like this.
You will see that I have stripped two or three more fibres from one side. This will help when you come to wrap the hackle.
Title: Part 2.. The fly!
Post by: scotfly on April 17, 2011, 12:43:03 AM
Post by: scotfly on April 17, 2011, 12:43:03 AM
Finally!! This is how you tie the fly.
The pattern as you read it in books or on the web will look something like this. As a general rule the materials will be listed in the order they are tied in, but not always.
HOOK ? STD Wet fly # 10 ? 14 (I have used Kamasan B175 #12 here)
THREAD ? Black 6/0 or 8/0 (I have used UTC 70 Here)
HACKLE ? Black Hen
RIB ? Copper Wire
BODY ? 3 Peacock Herl Fibres
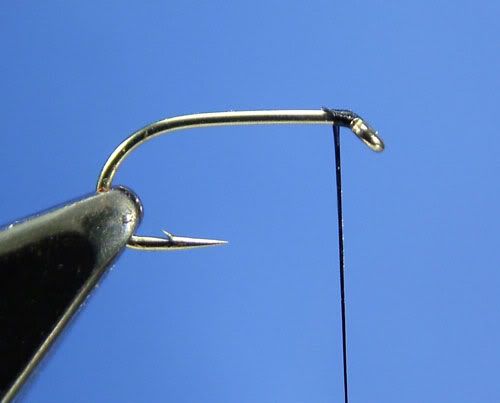
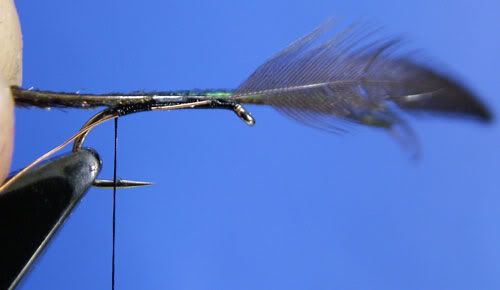
STEP 1
Mount the hook in the vice as shown above. Attach the thread as shown above and take 4 or 5 touching wraps working from the eye to the bend. With experience you will be able to reduce this to 2 or 3 wraps, but for now I would recommend a couple more to start with.
STEP 2
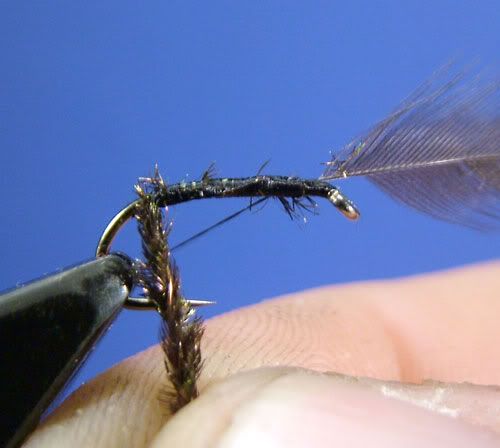
Take the hackle which you selected and prepared as shown above. Hold it across and above the hook shank as shown.
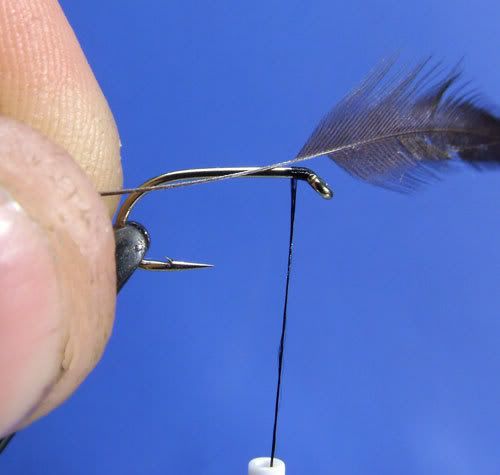
Then take two or three wraps of thread over it, trapping it between the thread and the hook shank.
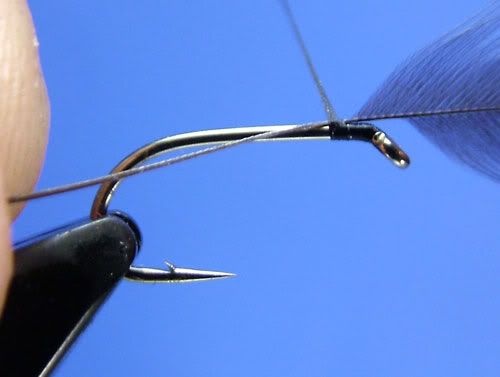
Then, holding the hackle stem up as a guide for the thread, continue wrapping to the point shown.
Then cut the rest of the stem off with your scissors. When cutting always be aware of other materials and thread, being careful that you don?t cut something you shouldn?t have.

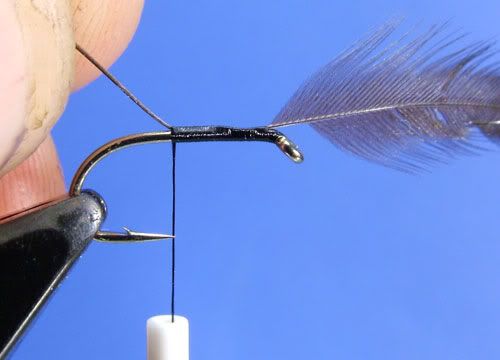
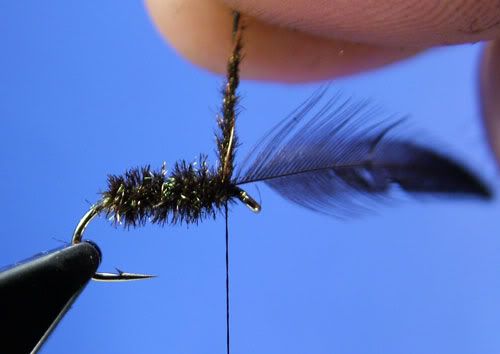
STEP 3
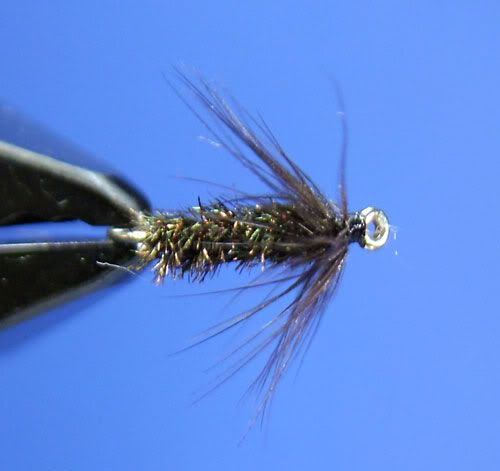
Take a length of copper wire and offer it up under the shank as shown.

Then take 2 or 3 wraps to secure it.
Once secured continue wrapping to a point opposite the hook barb.
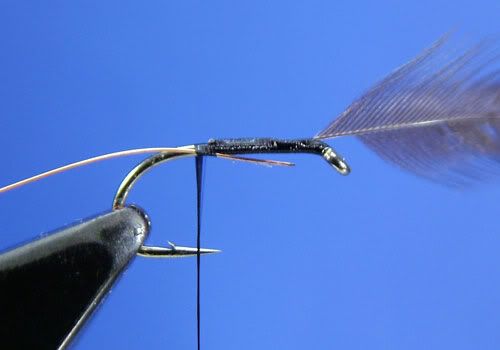
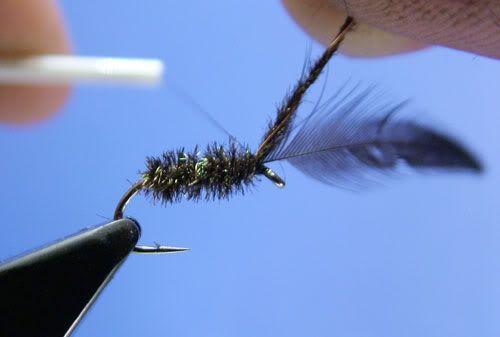
STEP 4
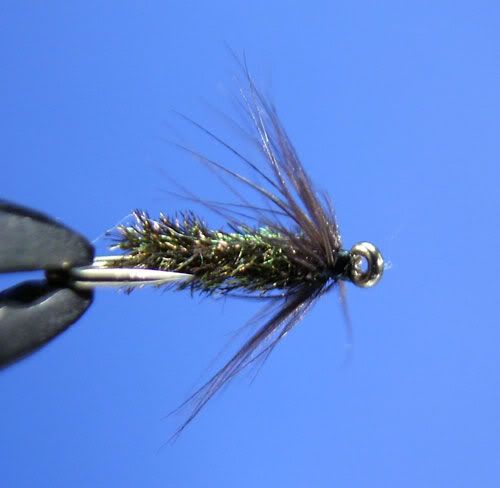
Take your three peacock herls and lay them on top of the hook shank as shown. Note that the tie in point is a little back from the tips. The tips are too fine and will break if you tie them in there.
Then tie them in working in touching turns towards the hook eye. The first turn of thread should be on top of the last turn of thread made before you tied the herls in.
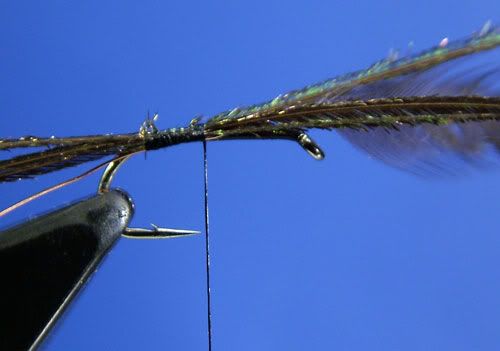
Trim the Herl tips off.
Then continue wrapping to a point approximately 2 or 3 turns of thread before the hackle. You can wrap to the hackle and then unwrap 2 or 3 turns until you learn to judge it.
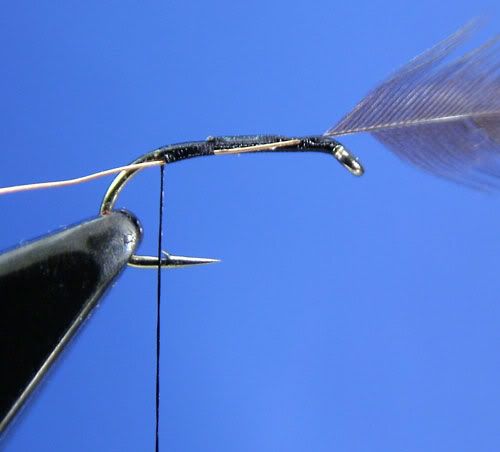
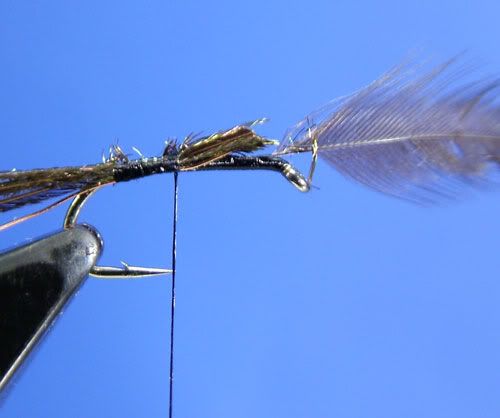
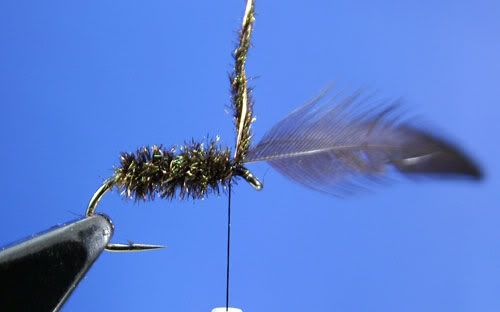
STEP 5
Now take the 3 herls and the copper wire and twist/roll them together. I find the easiest way is to hold them together near the end of the Herl between my thumb and index finger and then roll together. You want them fairly tight, but not too tight or they may break. A case of trial and error until you get it right.

Now start to wrap them in touching turns working towards the hook eye. You may find that you have to roll/twist them together again after two or three turns

Continue wrapping in touching turns until you reach the point where you left the thread.
Then, still holding the Herl and wire rope, take 2 or 3 wraps, working towards the hackle, over them as shown to secure them. You will find that you can?t take the thread all the way round because you right hand will be in the way. What you do is take the thread as far as you can then let it drop down the other side. The weight of the bobbin will stop it all unravelling.
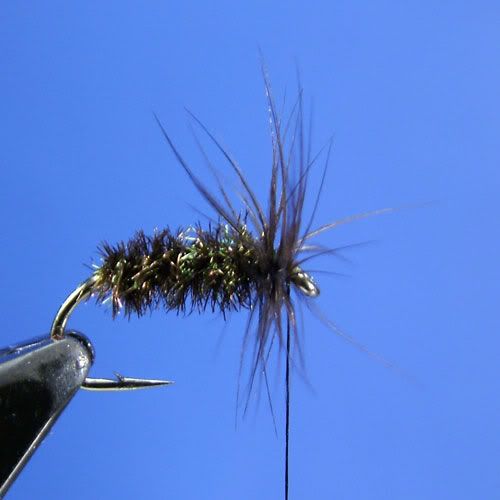
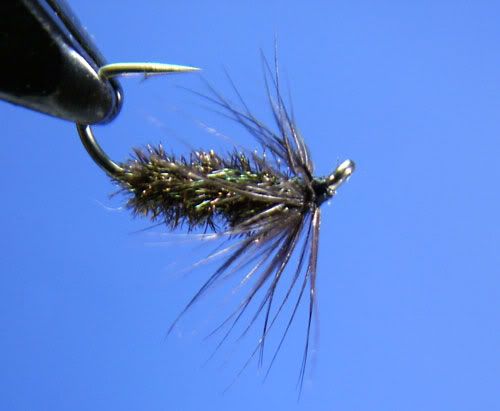
Then wrap back to the end of the body which will leave you something which looks like this.
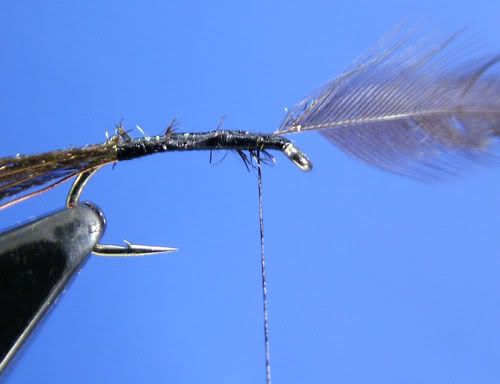
You can cut the waste wire and Herl off together, but no matter how close you cut it you will be left with an annoying tag of wire and the wire will blunt your scissors I prefer to separate the wire from the Herl and cut the waste Herl off with scissors.
Then take hold of the wire and twist.
Until it breaks.
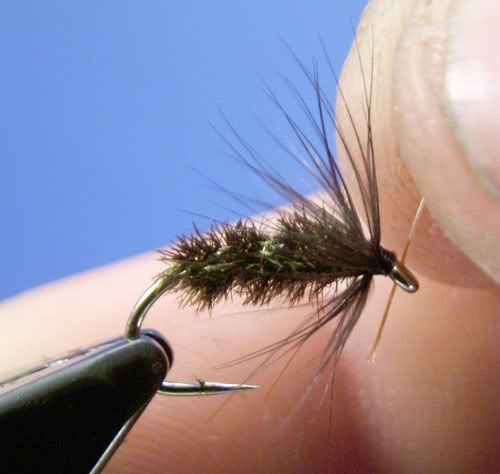
STEP 6
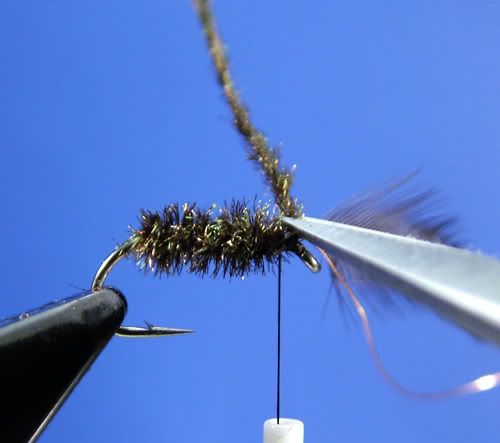
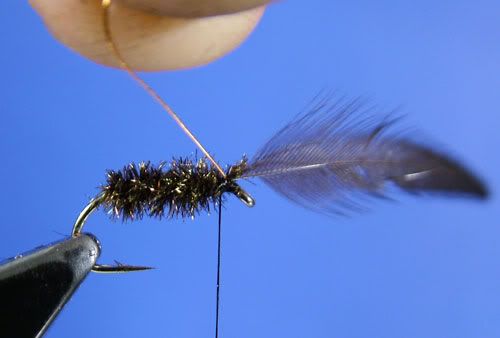
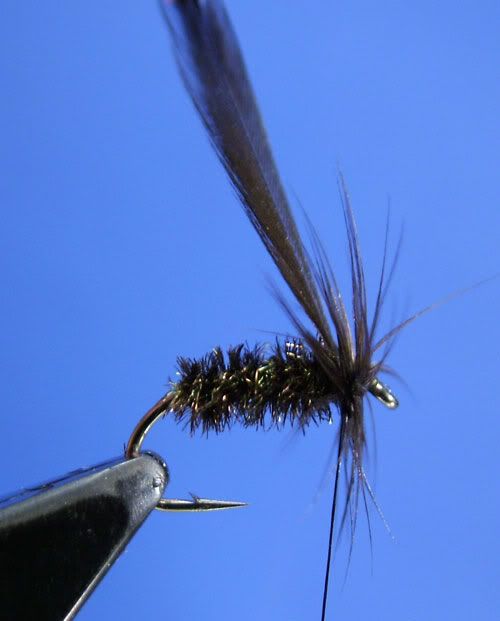
Take your hackle pliers and catch the hackle as shown.
Then start to wrap in touching turns toward the end of the body. Here I?ve taken 3 turns.
When you are wrapping try to keep a constant tension on the hackle. If you have too much tension or make any sudden jerks you will break the hackle. This is something you will learn with practice, but don?t be surprised or dismayed if you break a few hackles to begin with.
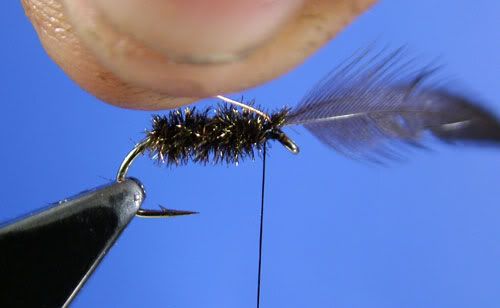
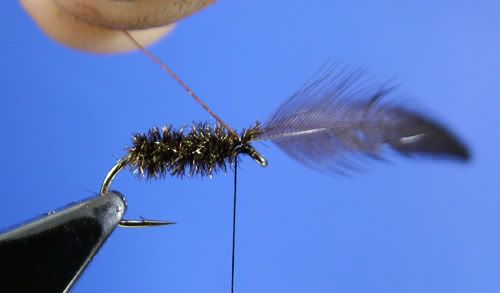
Holding the hackle tip as shown, take 2 or 3 turns of thread over to secure it.
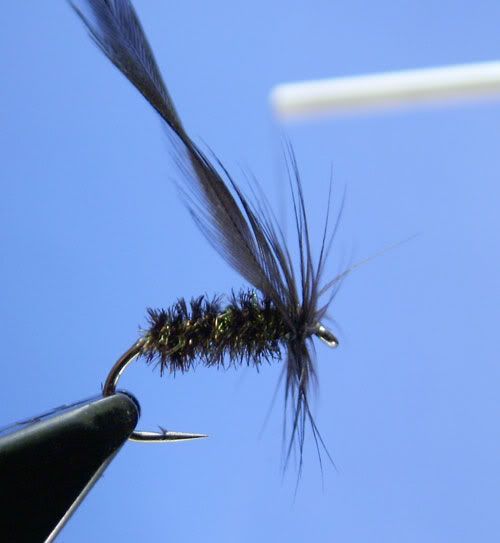
You can now cut off the waste hackle tip, but try not to cut any of the wrapped hackle fibres. You will find it easier if you open the scissors just enough to cut the hackle tip and no more.
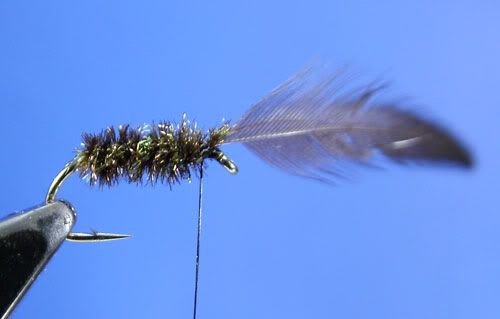
STEP 7
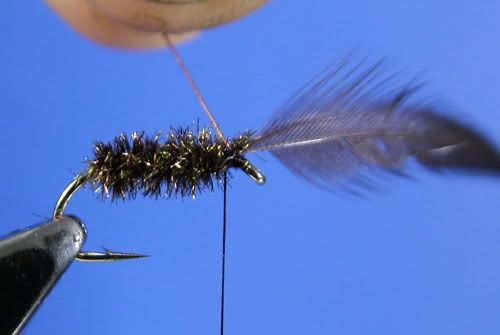
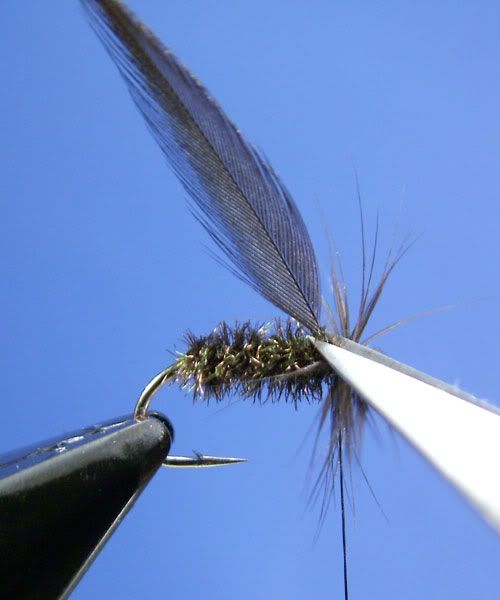
We now need to take the thread through the hackle to the head. Some tyers will tell you to slowly weave the thread through the hackle to avoid catching any fibres, this is the way I was taught, and used for many years. Until I read of a much quicker and simpler method, which I now always use. Simply wrap the thread quickly in open turns to the head. By wrapping quickly, the thread instead of trapping the fibres pushes them out of the way.
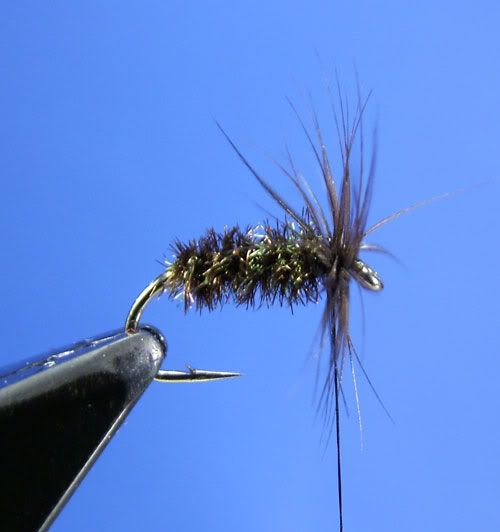
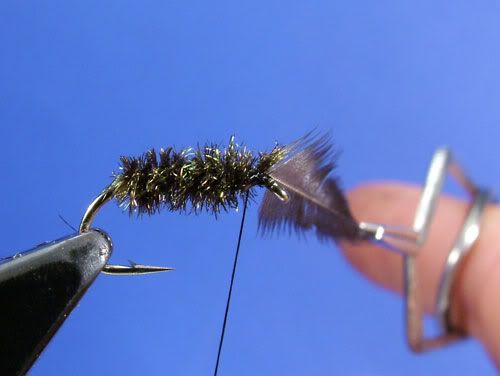
STEP 8
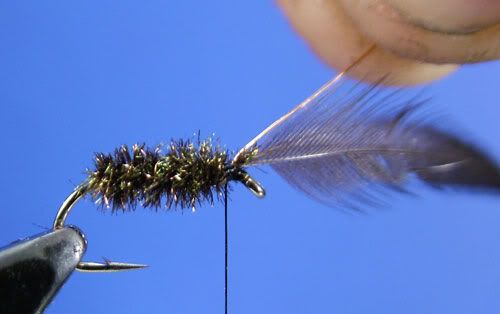
Use you fingers to stroke and hold the hackle fibres back.
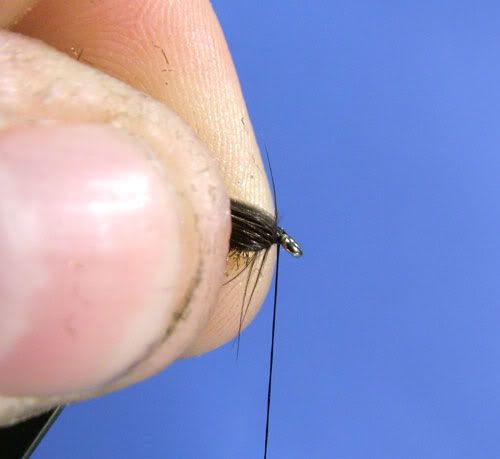
Then form a small neat head by wrapping to the eye and back to, but not onto or over, the hackle.
STEP 9
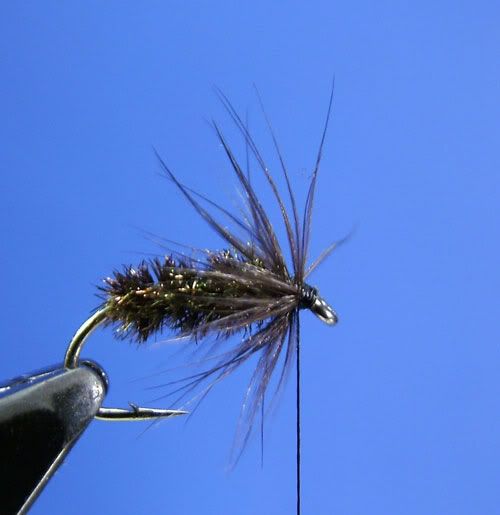
Holding the fibres back with your fingers make a whip finish.
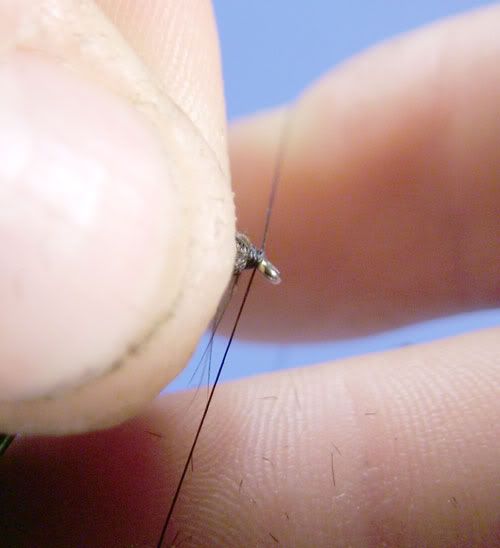
Then detach the thread by cutting it with your scissors.
STEP 10
To complete the fly, hold the fibres back and using your needle apply a spot of varnish to the head area, being careful that none goes on the hackle.
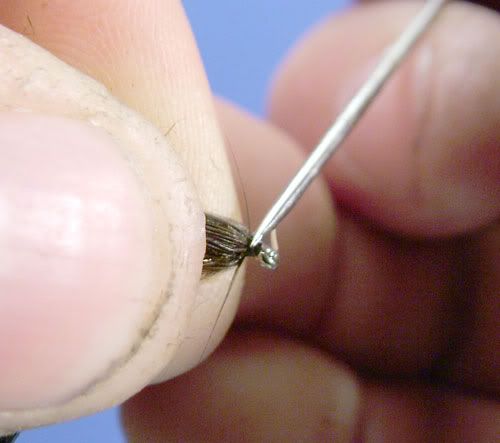
If the eye is clogged with varnish, take a hackle and strip the waste fibres from the bottom. Then pass it through the eye to remove any excess varnish.
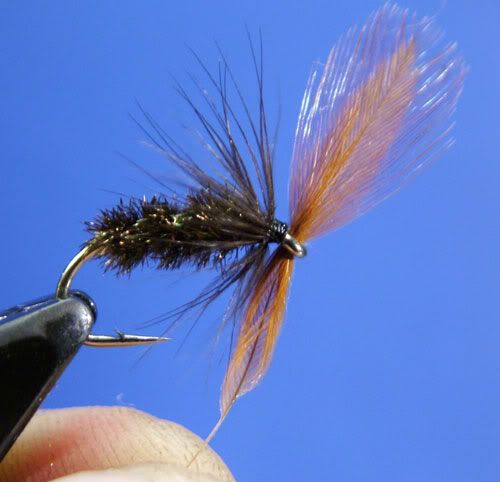
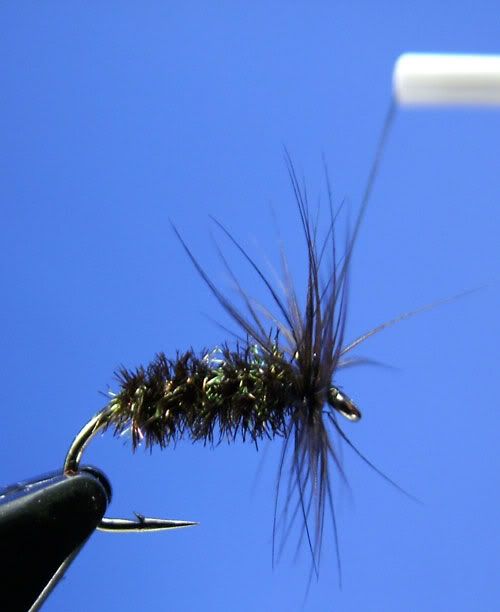
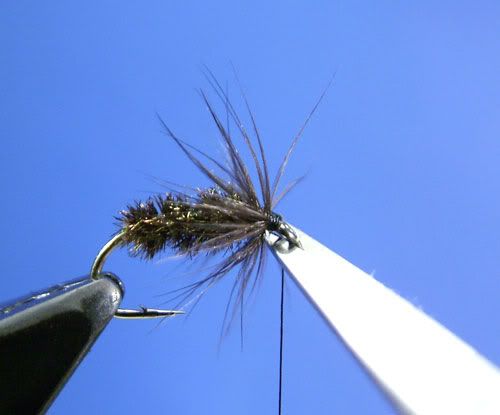
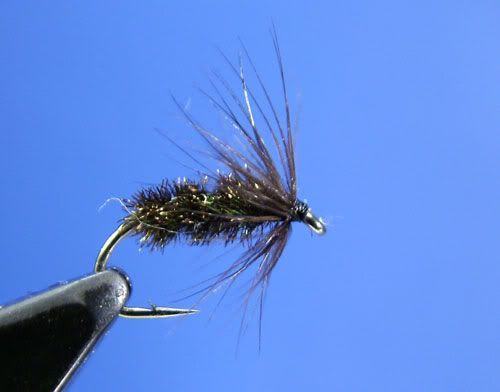
This is what your completed fly should look like.
Here are some additional video clips which you may find helpful. I did these some time ago. The way I have tied the fly on them is slightly different, but it will help you with many of the steps above.
 (http://s52.photobucket.com/albums/g8/scotfly/?action=view¤t=tiehackle.flv)
 (http://s52.photobucket.com/albums/g8/scotfly/?action=view¤t=bandpbody.flv)
 (http://s52.photobucket.com/albums/g8/scotfly/?action=view¤t=wraphackle.flv)
Once you can tie this one with confidence you can try a few more similar flys. There are plenty of flies in the step by step section for you to tackle. Try tying a few of each, then gradually introduce yourself to different techniques to build up your skills.
I hope to see some of your efforts posted in the pics forum.
As I said don?t let the length of this post put you off, it takes much longer to describe everything in as much detail as it actually takes to do.
The pattern as you read it in books or on the web will look something like this. As a general rule the materials will be listed in the order they are tied in, but not always.
HOOK ? STD Wet fly # 10 ? 14 (I have used Kamasan B175 #12 here)
THREAD ? Black 6/0 or 8/0 (I have used UTC 70 Here)
HACKLE ? Black Hen
RIB ? Copper Wire
BODY ? 3 Peacock Herl Fibres
STEP 1
Mount the hook in the vice as shown above. Attach the thread as shown above and take 4 or 5 touching wraps working from the eye to the bend. With experience you will be able to reduce this to 2 or 3 wraps, but for now I would recommend a couple more to start with.
STEP 2
Take the hackle which you selected and prepared as shown above. Hold it across and above the hook shank as shown.
Then take two or three wraps of thread over it, trapping it between the thread and the hook shank.
Then, holding the hackle stem up as a guide for the thread, continue wrapping to the point shown.
Then cut the rest of the stem off with your scissors. When cutting always be aware of other materials and thread, being careful that you don?t cut something you shouldn?t have.
STEP 3
Take a length of copper wire and offer it up under the shank as shown.
Then take 2 or 3 wraps to secure it.
Once secured continue wrapping to a point opposite the hook barb.
STEP 4
Take your three peacock herls and lay them on top of the hook shank as shown. Note that the tie in point is a little back from the tips. The tips are too fine and will break if you tie them in there.
Then tie them in working in touching turns towards the hook eye. The first turn of thread should be on top of the last turn of thread made before you tied the herls in.
Trim the Herl tips off.
Then continue wrapping to a point approximately 2 or 3 turns of thread before the hackle. You can wrap to the hackle and then unwrap 2 or 3 turns until you learn to judge it.
STEP 5
Now take the 3 herls and the copper wire and twist/roll them together. I find the easiest way is to hold them together near the end of the Herl between my thumb and index finger and then roll together. You want them fairly tight, but not too tight or they may break. A case of trial and error until you get it right.
Now start to wrap them in touching turns working towards the hook eye. You may find that you have to roll/twist them together again after two or three turns
Continue wrapping in touching turns until you reach the point where you left the thread.
Then, still holding the Herl and wire rope, take 2 or 3 wraps, working towards the hackle, over them as shown to secure them. You will find that you can?t take the thread all the way round because you right hand will be in the way. What you do is take the thread as far as you can then let it drop down the other side. The weight of the bobbin will stop it all unravelling.
Then wrap back to the end of the body which will leave you something which looks like this.
You can cut the waste wire and Herl off together, but no matter how close you cut it you will be left with an annoying tag of wire and the wire will blunt your scissors I prefer to separate the wire from the Herl and cut the waste Herl off with scissors.
Then take hold of the wire and twist.
Until it breaks.
STEP 6
Take your hackle pliers and catch the hackle as shown.
Then start to wrap in touching turns toward the end of the body. Here I?ve taken 3 turns.
When you are wrapping try to keep a constant tension on the hackle. If you have too much tension or make any sudden jerks you will break the hackle. This is something you will learn with practice, but don?t be surprised or dismayed if you break a few hackles to begin with.
Holding the hackle tip as shown, take 2 or 3 turns of thread over to secure it.
You can now cut off the waste hackle tip, but try not to cut any of the wrapped hackle fibres. You will find it easier if you open the scissors just enough to cut the hackle tip and no more.
STEP 7
We now need to take the thread through the hackle to the head. Some tyers will tell you to slowly weave the thread through the hackle to avoid catching any fibres, this is the way I was taught, and used for many years. Until I read of a much quicker and simpler method, which I now always use. Simply wrap the thread quickly in open turns to the head. By wrapping quickly, the thread instead of trapping the fibres pushes them out of the way.
STEP 8
Use you fingers to stroke and hold the hackle fibres back.
Then form a small neat head by wrapping to the eye and back to, but not onto or over, the hackle.
STEP 9
Holding the fibres back with your fingers make a whip finish.
Then detach the thread by cutting it with your scissors.
STEP 10
To complete the fly, hold the fibres back and using your needle apply a spot of varnish to the head area, being careful that none goes on the hackle.
If the eye is clogged with varnish, take a hackle and strip the waste fibres from the bottom. Then pass it through the eye to remove any excess varnish.
This is what your completed fly should look like.
Here are some additional video clips which you may find helpful. I did these some time ago. The way I have tied the fly on them is slightly different, but it will help you with many of the steps above.
(http://s52.photobucket.com/albums/g8/scotfly/?action=view¤t=tiehackle.flv) (http://s52.photobucket.com/albums/g8/scotfly/?action=view¤t=bandpbody.flv) (http://s52.photobucket.com/albums/g8/scotfly/?action=view¤t=wraphackle.flv)Once you can tie this one with confidence you can try a few more similar flys. There are plenty of flies in the step by step section for you to tackle. Try tying a few of each, then gradually introduce yourself to different techniques to build up your skills.
I hope to see some of your efforts posted in the pics forum.
As I said don?t let the length of this post put you off, it takes much longer to describe everything in as much detail as it actually takes to do.
Title: Re: Absolute beginner to first fly
Post by: Wildfisher on April 17, 2011, 09:25:47 AM
Post by: Wildfisher on April 17, 2011, 09:25:47 AM
Thanks Dennis- that is one inspiring post! Brilliant stuff.
Title: Re: Absolute beginner to first fly
Post by: Clan Chief on April 17, 2011, 11:56:51 AM
Post by: Clan Chief on April 17, 2011, 11:56:51 AM
Great Post/Thread :lol: one of the best. Should be an inspiration to those who have still to lift the Bobbin and fiddle with feathers.
Title: Re: Absolute beginner to first fly
Post by: Black-Don on April 18, 2011, 12:00:04 AM
Post by: Black-Don on April 18, 2011, 12:00:04 AM
Great thread Scotfly it will definately be of help to a lot of folk.
When I was out with Billy the other day he remarked on how much info was available on the internet for fly tyers and when you see threads like this it just hammers it home all the more. I remember when I started tying as a kid it was the local tying club to get you started and then gathering whatever info you could get from books. To read through a thread like this and even be able to ask the author if you have any questions is an invaluable resource.
Quote from: guest on April 17, 2011, 07:21:44 PM
:applause
Superb - a master class - Why didn't we have the internet when I was a lad (when computers were made of wood) :D
When I was out with Billy the other day he remarked on how much info was available on the internet for fly tyers and when you see threads like this it just hammers it home all the more. I remember when I started tying as a kid it was the local tying club to get you started and then gathering whatever info you could get from books. To read through a thread like this and even be able to ask the author if you have any questions is an invaluable resource.
Title: Re: Absolute beginner to first fly
Post by: cocotosh71 on April 22, 2012, 08:26:13 PM
Post by: cocotosh71 on April 22, 2012, 08:26:13 PM
Thanks for this scotfly, recently decided to start tying again, now that my man shed has been redesigned (cleaned oot), this has given me the buzz again...very informative..thank you.
Title: Re: Absolute beginner to first fly
Post by: Fadpasser on April 22, 2012, 09:25:30 PM
Post by: Fadpasser on April 22, 2012, 09:25:30 PM
Very helpfull, thanks for all the effort.
Title: Re: Absolute beginner to first fly
Post by: Allan Crawford on April 18, 2013, 04:17:40 AM
Post by: Allan Crawford on April 18, 2013, 04:17:40 AM
Thanks for the post just realizing how much of my fly tying I've developed/learned for myself :roll:
Picked up quiet a few things here, especially liked the idea of clearing varnish from the eye with a hackle :)
Picked up quiet a few things here, especially liked the idea of clearing varnish from the eye with a hackle :)